
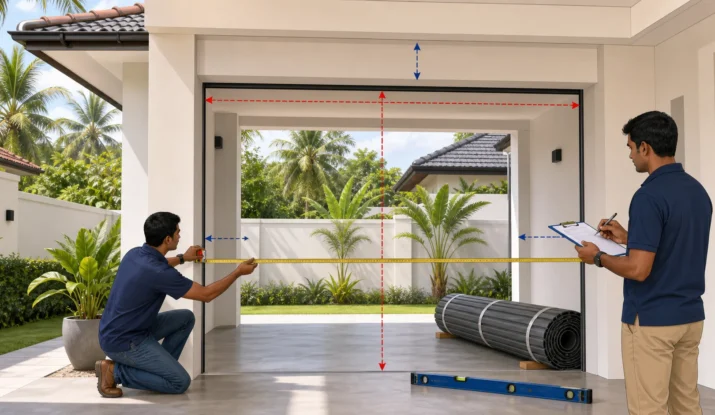
A roller door can be made accurately and still perform poorly if the site measurements are wrong. A narrow section of wall may block a guide. An uneven floor may leave a gap. A beam or pipe may prevent the curtain from rolling fully above the opening.
For anyone researching roller door measurement Sri Lanka, the safest goal is to create a clear site record for the supplier. You do not need to calculate the manufactured door size yourself. Measure the finished opening, identify restrictions and let the selected door specification determine the final allowances.
Fast Facts: Roller Door Measurement Sri Lanka
- Measure the finished opening width at the top, middle and bottom.
- Measure the height on the left, centre and right.
- Record side room, headroom, clear internal space and both diagonals.
- Use millimetres and keep every measurement instead of averaging the results.
- Check floor level, drainage, fixing surfaces, pipes, beams and electrical fittings.
- Do not calculate the manufacturing size unless the selected supplier instructs you to do so.
- Leave lifting, spring tensioning, axle installation and electrical work to qualified professionals.
Why One Width and Height Are Not Enough
Garage, shop and warehouse openings are rarely perfect rectangles. Masonry can taper. Plaster can vary in thickness. Floors may slope towards a drain or driveway.
Measure only after permanent plaster, tiles, screed and threshold work are complete. If you measure unfinished blockwork, later finishes may reduce the opening.
Use a rigid tape measure with millimetre markings. A spirit level, notepad, pencil, torch and helper are also useful. If you need a stepladder, place it on level ground, lock its braces and avoid overreaching. Safe ladder practice includes maintaining three points of contact while climbing.
Draw a simple rectangle on your notes. Label the inside and outside views so there is no confusion about the left and right sides.
Roller Door Measurement Sri Lanka: The Six Figures to Record
Start with the clear structural opening. Do not include the surrounding wall in its width or height. The terms below provide clear definitions of opening width, height, side room and headroom, but the required allowances must come from your selected roller door specification.
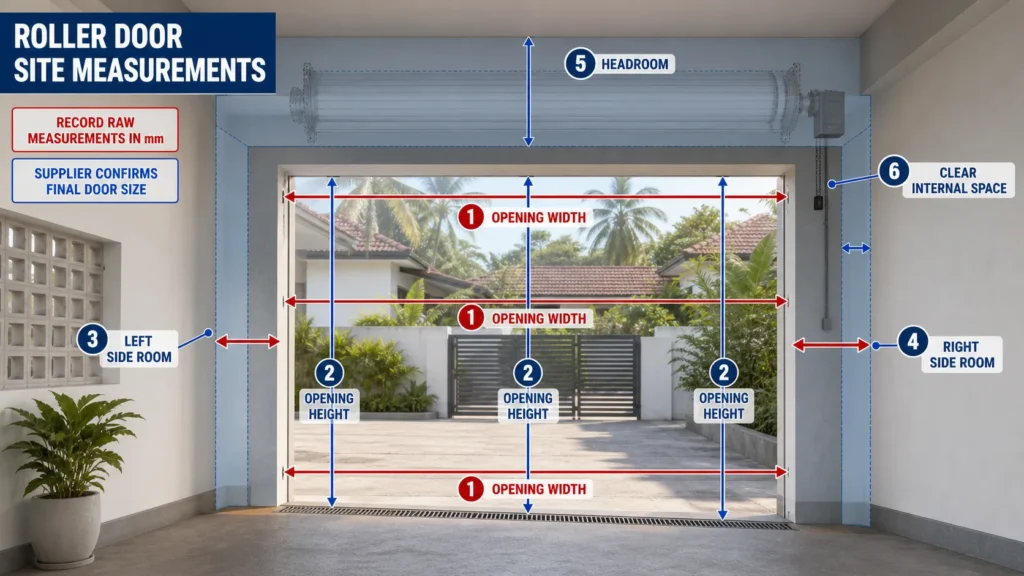
1. Opening width
Measure horizontally between the finished left and right sides at three positions:
- Near the top.
- Across the middle.
- Near the floor.
Record all three figures. A difference between them may show that the sides taper or bow.
2. Opening height
Measure from the finished floor to the underside of the lintel at the left, centre and right. Record all three heights.
Pay attention to sloping floors, raised thresholds and drains. The lowest height may restrict the door, while the floor shape can affect the bottom seal.
3. Left side room
Viewed from inside looking out, measure from the left edge of the opening to the nearest wall, column, pipe, shelf or fitting. This is a mounting area for the guide and related hardware.
4. Right side room
Repeat the same process on the right. Do not assume both sides match. An automatic opener may also need additional room on its selected side.
5. Headroom
Measure from the top of the finished opening to the ceiling or first obstruction. Check beams, gutters, roof members, lights and pipes.
The rolled curtain, brackets and axle occupy this area. Required headroom depends on the door model, opening height and mounting arrangement.
6. Clear internal space
Record the unobstructed area immediately behind and around the opening. A roller door normally needs less ceiling depth than a sectional door, but the curtain roll, controls and service access still require clear space.
Do not convert these figures into an order size by adding overlap or subtracting guide widths. Different systems use different allowances. Send the raw measurements to the supplier.
Check the Opening, Floor and Fixing Surfaces
Measure both diagonals, from the top-left corner to the bottom-right and then in the opposite direction. A large difference suggests the opening is out of square.
Use a spirit level to check the floor and lintel. Check both sides for plumb, which means vertically straight. Photograph any obvious variation.
Next, inspect the surfaces that will carry the guides and brackets. Note whether they are concrete, brick, blockwork or steel. Report cracked plaster, loose masonry, hollow sections and water damage. A neat finish cannot compensate for a weak fixing base.
Check the proposed mounting face from top to bottom. Downpipes, conduits, switches and shelving may need relocation before installation.
Also measure the actual vehicle. Include mirrors, roof racks and any equipment carried above the roof. A door may cover the building opening correctly while leaving less drive-through space after the guides are fitted.
Finally, inspect the threshold during rain if possible. Sri Lanka experiences four rainfall seasons, with substantial variation across the island. Water flowing towards the opening may require drainage or floor correction before the door is installed.
Prepare for the Motor, Weather and Installation Team
If you want automation, mark the preferred motor side while standing inside and looking out. Ask the supplier to confirm the required clearance before moving any fittings.
A suitable earthed power point may be needed within reach of the opener. It should be protected from weather and positioned according to the product instructions. Use a qualified electrician for new wiring or outlet changes.
Tell the supplier if the property is near the coast or exposed to wind-driven rain. Salt, moisture and trapped dirt can increase corrosion risk. This information helps the installer discuss suitable finishes, fixings and maintenance.
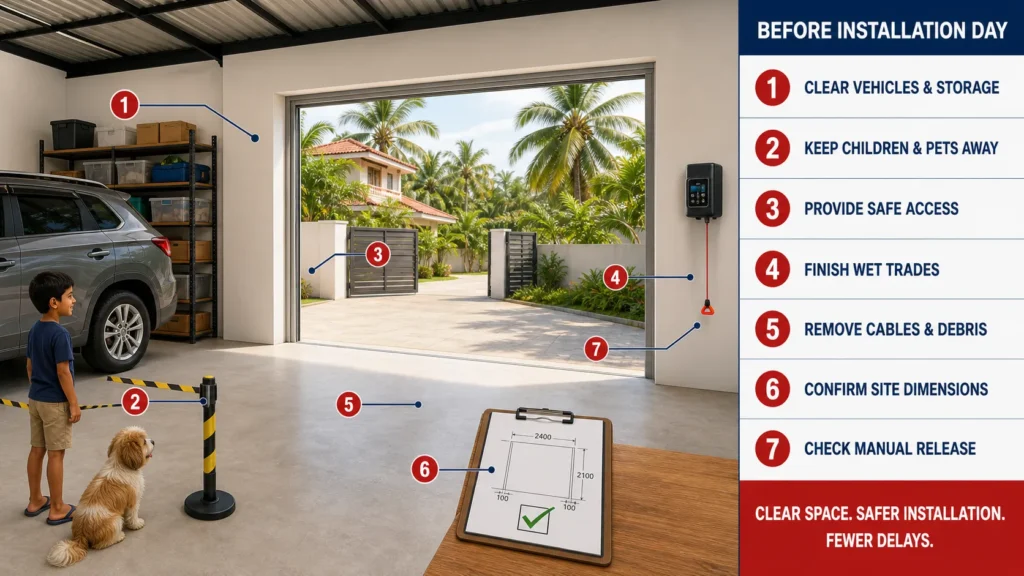
Clear preparation reduces delays and gives the installation team room to lift and align the door safely.
Avoid These Expensive Measuring Mistakes
The first mistake is recording one width and one height. Three measurements in each direction reveal restrictions that a centre measurement may miss.
The second is mixing units. Record every dimension in millimetres and write the unit beside each figure.
The third is measuring before finishes are complete. Plaster, tiles, render and screed can change the final opening.
The fourth is guessing the required overlap or clearance. Published examples are not universal specifications. Door size, curtain design, brackets and motor choice can change the requirement.
The fifth is ignoring the mounting surface. Accurate dimensions do not solve weak masonry, restricted side walls or a damaged lintel.
The sixth is relying on photographs alone. Photos provide context, but perspective can distort size. Send photographs together with written measurements.
Helpful Guide
Learn how to identify common faults and choose the right response in this guide to roller door repairs in Sri Lanka.
Know Where DIY Preparation Should Stop
Measuring, photographing and clearing the site are sensible DIY tasks. Installing the axle, lifting the curtain, setting spring tension and adjusting load-bearing parts require different skills and tools.
Stored spring energy and a heavy moving door can cause serious injury. Automated doors also need correct limits, controls and safety checks. Do not loosen spring assemblies, brackets or cables to investigate a fit problem.
Send your installer:
- Three opening widths.
- Three opening heights.
- Left and right side room.
- Headroom.
- Clear internal space.
- Both diagonal measurements.
- Floor and lintel level observations.
- Wall and lintel material.
- Motor-side preference.
- Power-point location.
- Photos from inside, outside and both side walls.
- Notes about drainage, coastal exposure and obstructions.
A professional such as Vision Industries can verify this record during a site visit and confirm the manufacturing dimensions. That final check protects the fit, operation and long-term reliability of the door.
Frequently Asked Questions
How do I measure an opening for a roller door?
Measure the finished opening width at the top, middle and bottom, then measure the height on the left, centre and right. Record every result in millimetres. Also measure both side spaces, headroom, diagonals and the clear area around the opening.
How much headroom and side room does a roller door need?
The required clearance depends on the door size, curtain, brackets, mounting method and motor. Do not apply a general allowance to your order. Give the supplier your raw opening, headroom and side-room measurements so the correct product specifications can be used.
Can I install a roller door myself after taking the measurements?
DIY measuring and site clearing are reasonable, but lifting the door, mounting the axle and setting spring tension can be hazardous. Electrical work also needs suitable expertise. A professional installer should verify the dimensions and complete safety-critical installation, adjustment and testing.